@vuese/cli
一个命令行工具,用来快速为你的 vue 组件生成文档站点或 markdown 文件。
全局安装:
yarn global add @vuese/cli
这使得 vuese 命令全局可用。
动机
在开始之前我们先聊一聊,为什么我要做这个项目。
之前,当你创建一个 Vue 组件时,你需要手动的为你的组件编写文档,这包括:
props:你的组件接收哪些props,以及他们的类型、默认值、是否必须等等events: 你的组件会提供哪些事件,以及事件回调函数的参数slots: 你的组件提供哪些slots,他们的含义是什么methods: 有时候你的组件也会提供一些允许外部通过组件实例调用的方法
除了要手动编写以上内容之外,最痛苦的莫过于编写 markdown 文件本身,当然你可以使用一些所见即所得的编辑工具,但能够自动生成不是更好吗?
所以我创建了这个项目。
快速开始
假设你的项目结构如下:
root
├── src
├──├──  components
├──├──├──  Button.vue
├──├──├──  ButtonGroup.vue
在 root 目录运行如下命令:
vuese gen
此时,你会在你的项目根目录发现 website 目录,如下:
root
├── src
├──├── components
├──├──├── Button.vue
├──├──├── ButtonGroup.vue
├── website
├──├── index.html
├──├── components
├──├──├── Button.md
├──├──├── ButtonGroup.md
接着继续运行如下命令:
vuese serve --open
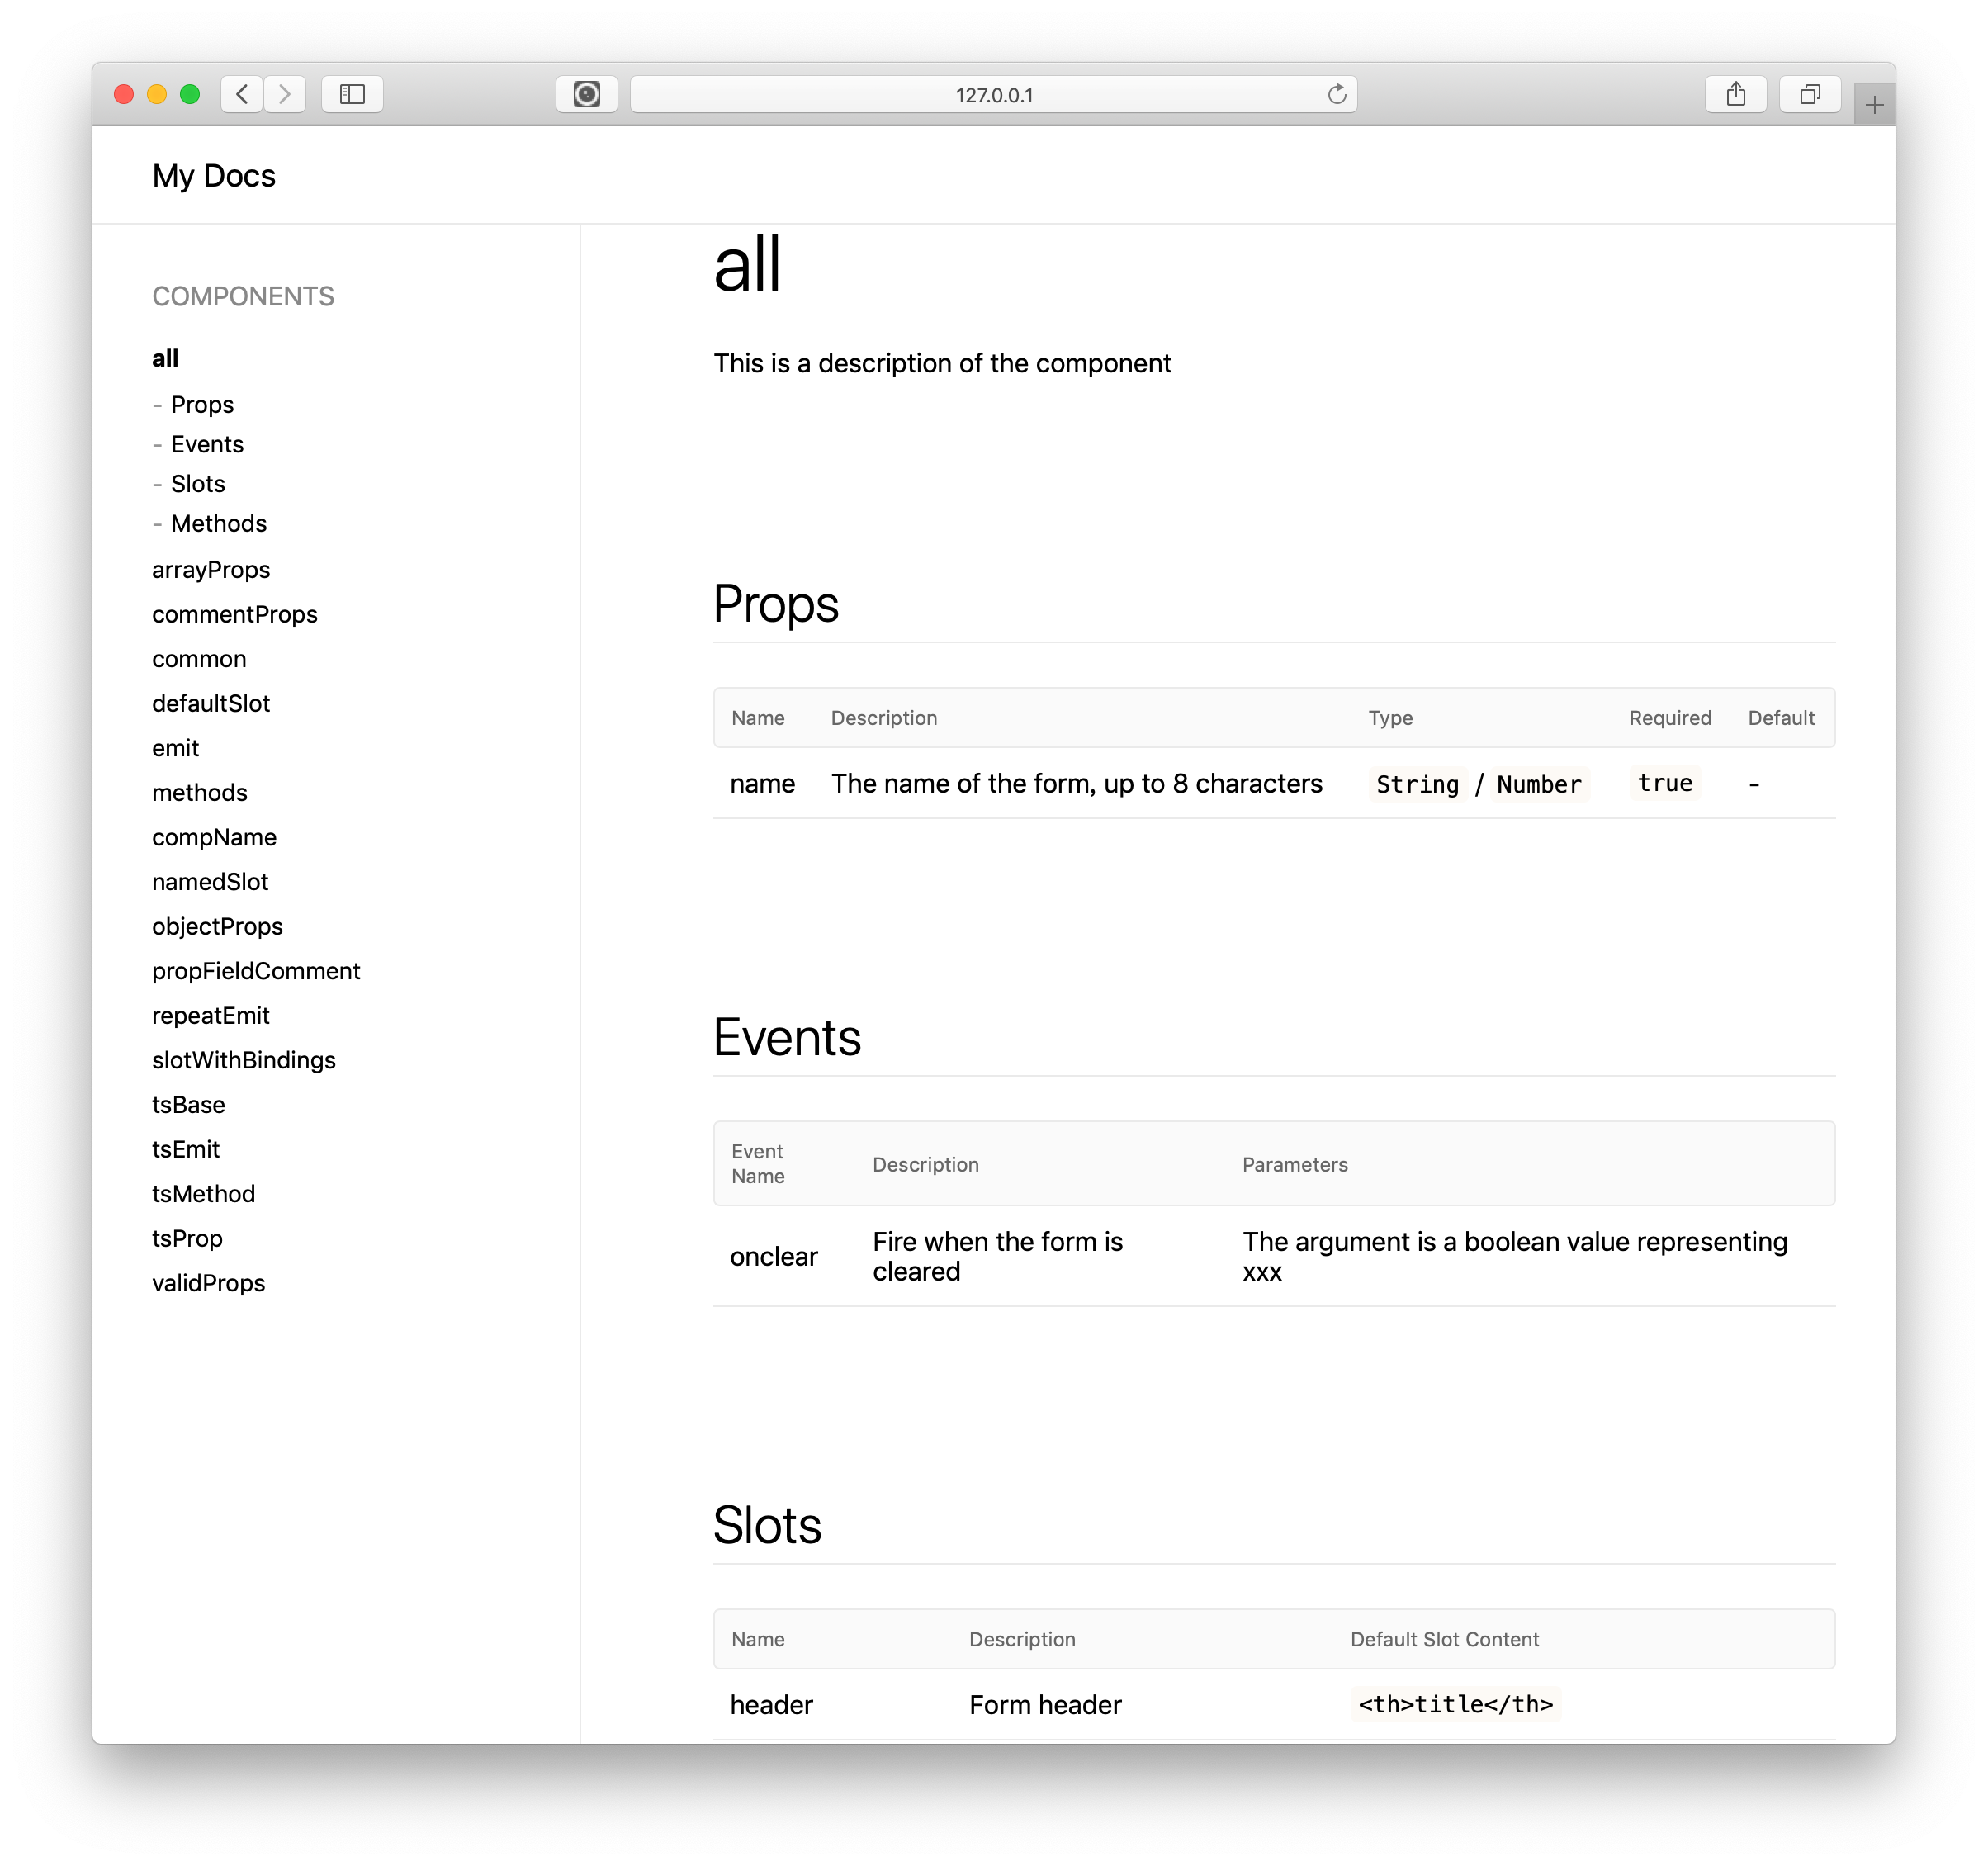
这为之前生成的文档网站创建一个服务器,并打开浏览器。恭喜🎉,你已经拥有组件的文档了,一个预览图:

为你的组件编写文档
编写文档的过程,实际上就是在为你的代码添加注释。
props
假设我们有一个叫做 someProp 的 prop:
props: {
  someProp: {
    type: String
  }
}
在没有任何注释的情况下,vuese 会生成如下表格:
| Name | Description | Type | Required | Default |
|---|---|---|---|---|
| someProp | - | String | false | - |
可以发现,叫做 someProp 的 prop 缺少描述(Description),你只需要为 someProp 属性添加前导注释即可:
props: {
  // 表单的名字
  someProp: {
    type: String
  }
}
再来看一下生成的表格:
| Name | Description | Type | Required | Default |
|---|---|---|---|---|
| someProp | 表单的名字 | String | false | - |
除此之外,我们也注意到表格中类型(Type)一栏的值是 String,它自动从 someProp 的 type 属性获取,但是有的时候你或许想要在文档中给用户展示更加明确的选择,很简单,你只需要为 type 属性添加前导注释即可,如下:
props: {
  // 表单的名字
  name: {
    // `'TOP'` / `'BOTTOM'`
    type: String
  }
}
再来看一下生成的表格:
| Name | Description | Type | Required | Default |
|---|---|---|---|---|
| someProp | 表单的名字 | 'TOP' / 'BOTTOM' | false | - |
你还可以为 someProp 指定默认值:
props: {
  // The name of the form
  name: {
    // `'TOP'` / `'BOTTOM'`
    type: String,
    required: true,
    default: 'TOP'
  }
}
生成的表格如下:
| Name | Description | Type | Required | Default |
|---|---|---|---|---|
| someProp | 表单的名字 | 'TOP' / 'BOTTOM' | false | 'TOP' |
TIP
你也可以通过给 default 属性添加前导注释来自定义默认值
props: {
  // The name of the form
  name: {
    // `'TOP'` / `'BOTTOM'`
    type: String,
    required: true,
    // 默认值是:`TOP`
    default: 'TOP'
  }
}
如下:
| Name | Description | Type | Required | Default |
|---|---|---|---|---|
| someProp | 表单的名字 | 'TOP' / 'BOTTOM' | false | 默认值是:TOP |
规则很简单
使用 Vuese 生成文档时,如果你想自定义文档内容,那就为它添加前导注释。
slots
模板中的插槽
假设你的模板拥有一个具名插槽,并且该插槽拥有默认内容,如下:
<slot name="header">
  <th>title</th>
</slot>
Vuese 为其生成的表格如下:
| Name | Description | Default Slot Content |
|---|---|---|
| header | - | - |
可以看到名字叫做 header 的插槽没有描述(Description),同时也没有对默认插槽内容的描述,这时你只需要为其添加前导注释:
<!-- Form header -->
<slot name="header">
  <!-- `<th>title</th>` -->
  <th>title</th>
</slot>
生成的表格如下:
| Name | Description | Default Slot Content |
|---|---|---|
| header | Form header | <th>title</th> |
有时,你可能会遇到嵌套插槽的情况:
<!-- Form header -->
<slot name="header">
  <!-- `<th>title</th>` -->
  <slot name="defaultHeader"></slot>
</slot>
需要注意的是,注释内容 <!-- `<th>title</th>` --> 虽然是 defaultHeader 插槽的前导注释,但它并不会作为该插槽的描述,它依然是 header 插槽的默认内容的描述。为了给 defaultHeader 插槽添加描述,你需要为其添加另一个前导注释:
<!-- Form header -->
<slot name="header">
  <!-- `<th>title</th>` -->
  <!-- Custom form header -->
  <slot name="defaultHeader"></slot>
</slot>
此时,生成的表格如下:
| Name | Description | Default Slot Content |
|---|---|---|
| header | Form header | <th>title</th> |
| defaultHeader | Custom form header | - |
脚本中的 slots
[TODO]
events
脚本中的 events
假设我们有如下代码:
methods: {
  clear () {
    this.$emit('onclear', true)
  }
}
vuese 会为其生成如下表格:
| Event Name | Description | Parameters |
|---|---|---|
| onclear | - | - |
只需要为其添加前导注释即可:
methods: {
  clear () {
    // Fire when the form is cleared
    this.$emit('onclear', true)
  }
}
生成的表格如下:
| Event Name | Description | Parameters |
|---|---|---|
| onclear | Fire when the form is cleared | - |
如果你想对回调函数的参数进行描述,你需要使用 @arg 注解:
methods: {
  clear () {
    // Fire when the form is cleared
    // @arg The argument is a boolean value representing xxx
    this.$emit('onclear', true)
  }
}
生成的表格如下:
| Event Name | Description | Parameters |
|---|---|---|
| onclear | Fire when the form is cleared | The argument is a boolean value representing xxx |
模板中的事件
[TODO]
.sync 事件
如果组件的 prop 设计为 .sync,通常在你的组件代码中会包含名为 update:xxx 类的事件,例如:
this.$emit('update:some-prop', true)
但对于用户来讲,他们不关心这类事件,所以在生成的文档中我们特意不去包含这类事件。
v-model 事件
[TODO]
methods
假设我们有如下方法:
methods: {
  clear (bol) {
    // ...
  }
}
对于如上这段代码,vuese 不会为它生成文档,这是因为:组件的设计中方法大多是内部使用的,当然有些情况下对外暴露组件实例的方法也非常有用,为了让 vuese 为方法生成文档,你需要使用 @vuese 注解主动告诉 vuese:“这个方法是为组件使用者设计的”,如下:
methods: {
  // @vuese
  clear (bol) {
    // ...
  }
}
这时,生成的表格如下:
| Method | Description | Parameters |
|---|---|---|
| clear | - | - |
为了描述该方法和它的参数,你可以为其添加注释,规则与 events 相同:
methods: {
  // @vuese
  // Used to manually clear the form
  // @arg The argument is a boolean value representing xxx
  clear (bol) {
    // ...
  }
}
当然啦,如果你嫌弃单行注释看上去不舒服,你可以使用块注释:
methods: {
  /**
   * @vuese
   * Used to manually clear the form
   * @arg The argument is a boolean value representing xxx
   */
  clear (bol) {
    // ...
  }
}
生成的表格如下:
| Method | Description | Parameters |
|---|---|---|
| clear | Used to manually clear the form | The argument is a boolean value representing xxx |
Class 风格的组件
@Component
如果你使用 vue-class-component,所有 @Component 装饰器内的选项都会被解析,解析的规则与上面的解析相同,这是因为 @Component 装饰器的参数本身就是 vue 组件选项对象,如下:
@Component({
  props: {
    // The name of the form, up to 8 characters
    name: {
      type: [String, Number],
      required: true,
      validator () {}
    }
  },
  methods: {
    // @vuese
    // Used to manually clear the form
    /**
     * @arg The first parameter is a Boolean value that represents...
     */
    clear () {
      // Fire when the form is cleared
      // @arg The argument is a boolean value representing xxx
      this.$emit('onclear', true)
    }
  }
})
export default class Child extends Vue {}
它将会被正确的解析🎉。
类方法(Class Method)
使用 vue-class-component 后,类方法就是组件的 methods,它可以被解析,且解析规则不变:
@Component
export default class Child extends Vue {
  /**
   * @vuese
   * This is a function exposed as an interface
   *
   * @arg The first parameter is a Boolean value that represents...
   */
  someMethod(a) {

  }
}
生成的表格如下:
| Method | Description | Parameters |
|---|---|---|
| someMethod | This is a function exposed as an interface | The first parameter is a Boolean value that represents... |
通常,我们会同时使用 vue-class-component 和 vue-property-decorator,因为 vue-property-decorator 提供了很多好用的属性装饰器,其中我们只关注 @Prop 和 @Emit
@Prop
还是上面提到的规则,只需要为 @Prop 装饰器添加前导注释即可:
@Component
export default class Child extends Vue {
  // Description of prop
  @Prop(Number)
  a: number

  @Prop([Number, String])
  b: number | string

  @Prop({
    type: Number,
    // The default value is 1
    default: 1,
    required: true
  })
  c: number
}
生成的表格如下:
| Name | Description | Type | Required | Default |
|---|---|---|---|---|
| a | Description of prop | Number | false | - |
| b | - | Number / String | false | - |
| c | - | Number | true | The default value is 1 |
@Emit
你只需要给 @Emit 装饰器添加前导注释,规则与上面提到的事件相同:
@Component
export default class Child extends Vue {

  // Fire when the form is cleared
  // @arg The argument is a boolean value representing xxx
  @Emit()
  onClick() {}

  @Emit('reset')
  resetHandle() {}
}
生成的表格如下:
| Event Name | Description | Parameters |
|---|---|---|
| on-click | Fire when the form is cleared | The argument is a boolean value representing xxx |
| reset | - | - |
TIP
如果你没有为 @Emit() 装饰器提供参数,则会把被 @Emit() 装饰器修饰的函数的名字转换成由连字符(-)组成的字符串,并作为事件的名称。
mixins 2.2.0+
有时你需要明确的知道当前组件混入(Mixins)了哪些组件/功能,vuese 会为你组件中的 mixins 选项生成文档,假设我们有如下代码:
export default {
  mixins: [MixinA, MixinB, MixinC]
}
生成的表格如下:
| MixIn |
|---|
| MixinA |
| MixinB |
| MixinC |
jsx / tsx
[TODO]
分组 2.1.0+
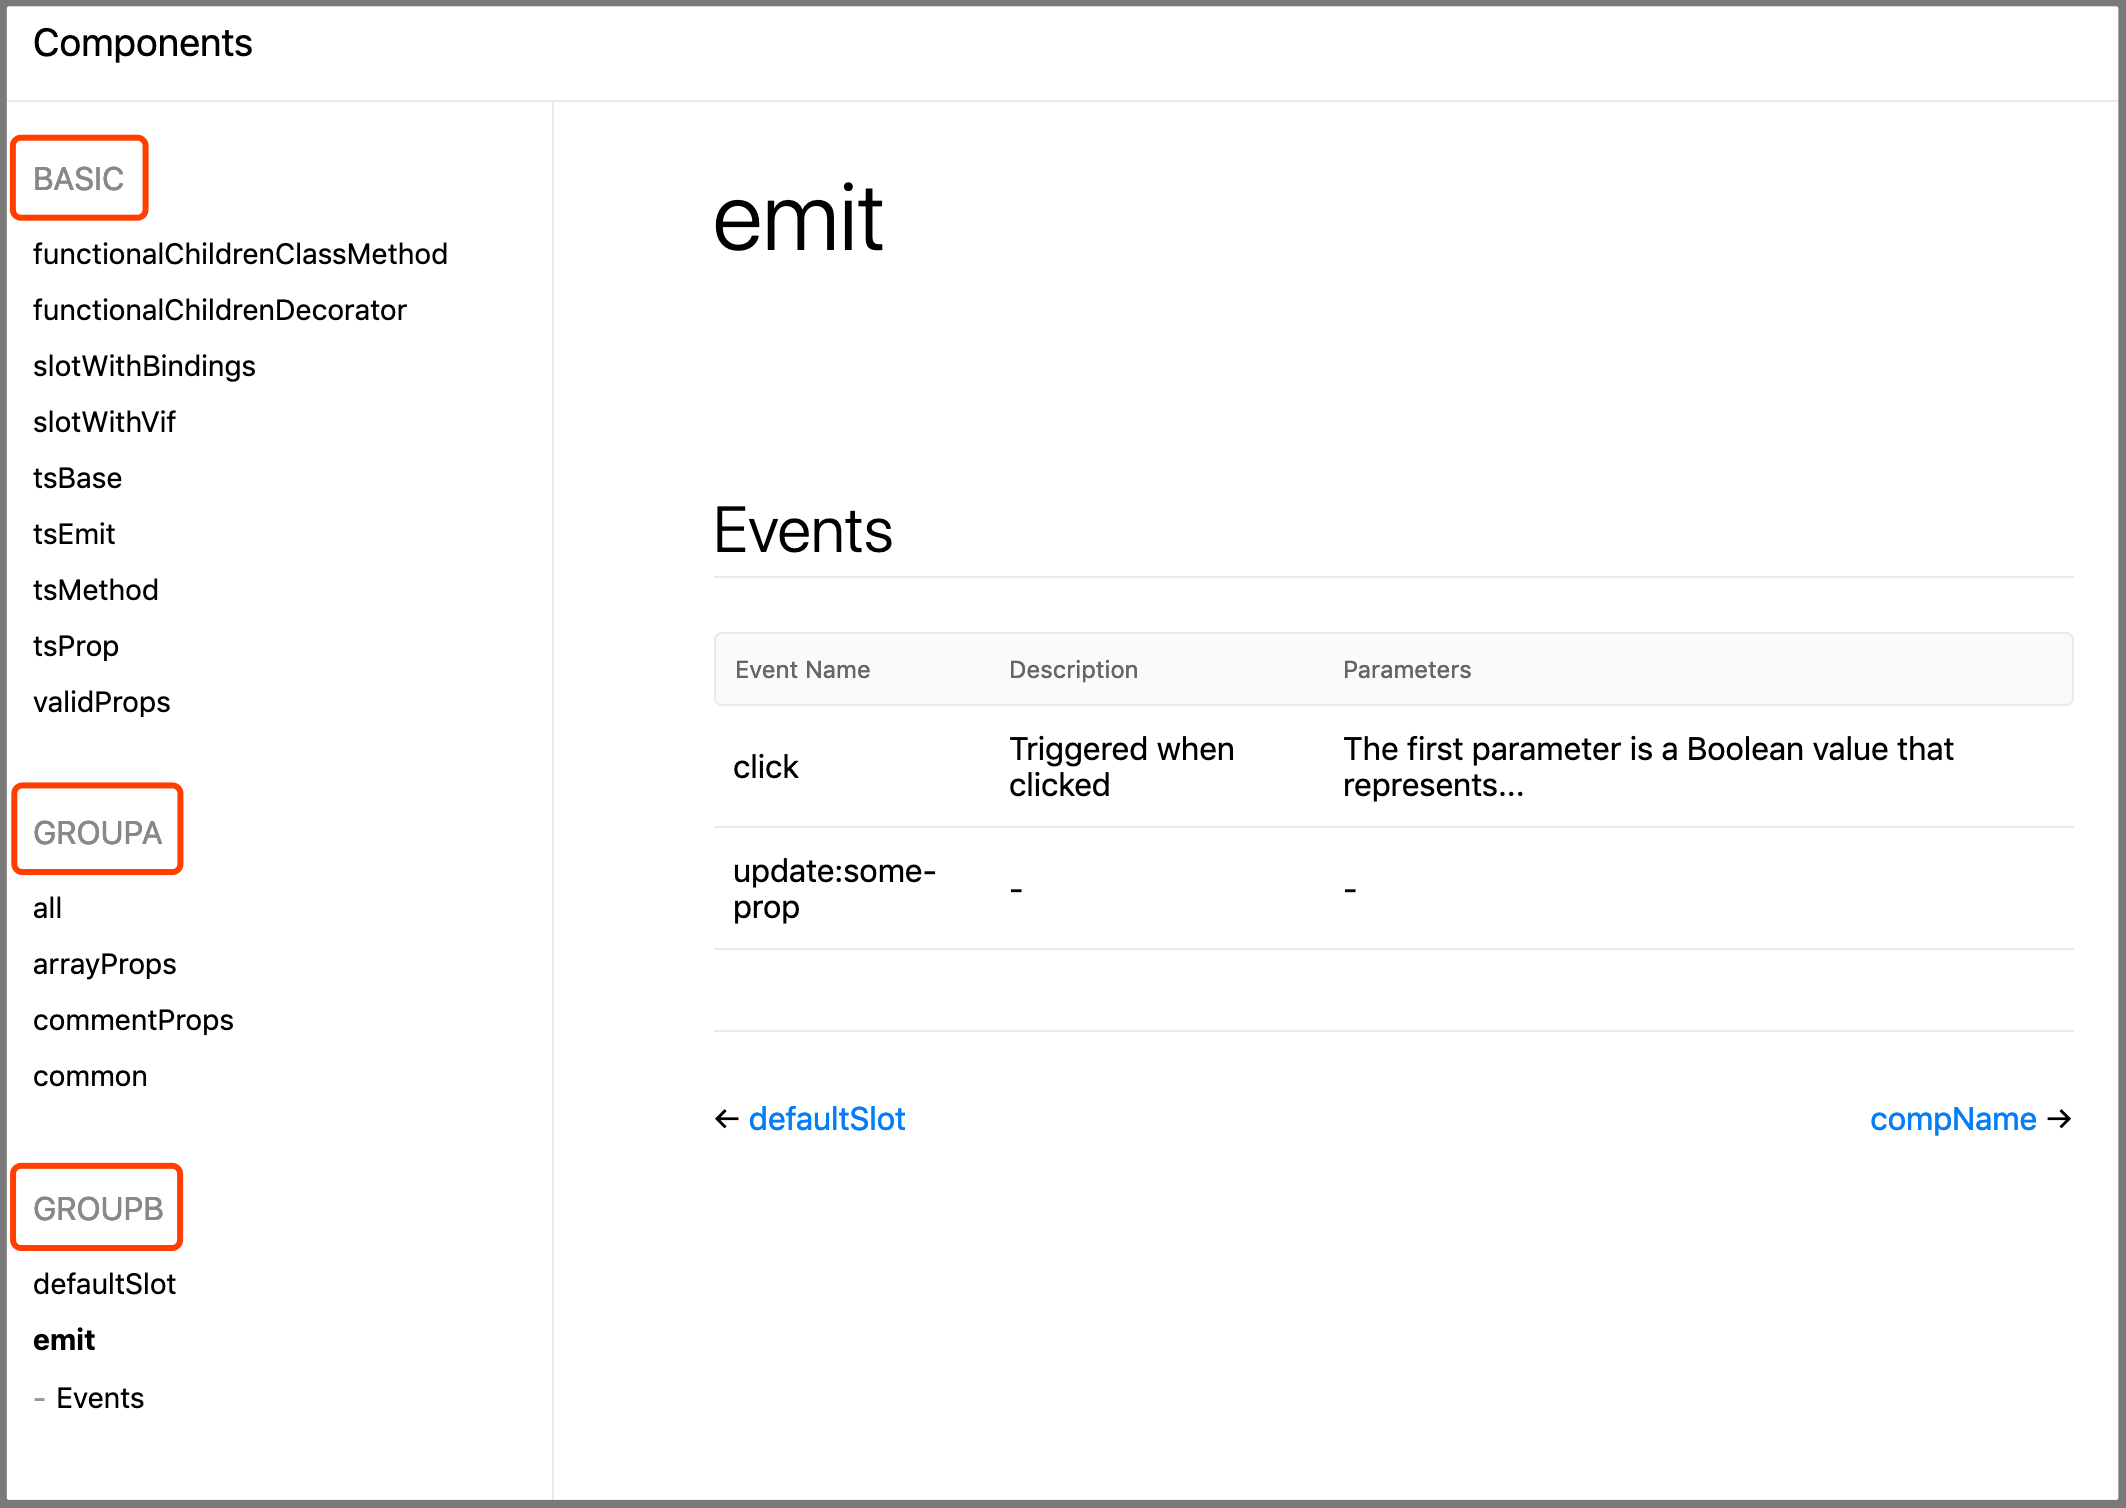
如果你要生成的是 Docute 文档,你可以将组件分组展示,如下图所示:

实现分组很简单,只需要为你的组件定义添加 @group [groupName] 前导注释即可,如下代码所示:
// @group GroupA
export default {
  // ...
}
当然,默认分组的名字是 BASIC。
TIP
分组的名字会被转为大写字母展示。
也适用于 class 风格的组件:
@Component({
  // ...
})
// @group GroupD
export default class Child extends Vue {}
组件的描述
作为文档,你应该使用一句话向使用者介绍组件的用途,vuese 也会为你生成组件的描述,只需要在组件定义上添加一行普通的前导注释即可,如下:
// 这是组件的描述
export default {
  // ...
}
当然这并不与分组(@group)冲突:
// 这是组件的描述
// @group GroupA
export default {
  // ...
}
或者使用多行注释:
/**
 * @group GroupA
 * This is a description of the component
 */
export default {
  // ...
}
也适用于 class 风格的组件:
@Component({
  // ...
})
/**
 * @group GroupA
 * This is a description of the component
 */
export default class Child extends Vue {}
注意事项
WARNING
当组件没有任何的 props、slots、events 以及 methods(使用了 @vuese)时,vuese 不会为其生成文档。
可以改变这个默认行为,你需要保证组件满足以下两个条件:
- 1、在组件定义上使用
@vuese注解,例如:
// @vuese
export default {
  // ...
}
或者 TypeScript 中:
// @vuese
export default class ActionBar extends Vue {
  // ...
}
- 2、除了要在组件定义上添加
@vuese注解之外,必须保证组件拥有name选项:
// @vuese
export default {
  name: 'MyComponent'
}
在 TypeScript 中:
@Component({
	name: 'MyComponent'
})
// @vuese
export default class MyComponent extends Vue {
  // ...
}
当组件满足以上两个条件之后,即使组件没有任何的 props、slots、events 以及 methods(使用了 @vuese),vuese 依然会为其生成文档,当然了,文档中只会包含组件名称和组件的描述。
快速以文档的方式预览组件
如果你不想生成文档,而只是希望以文档的方式快速的预览一个组件,当然可以,运行如下命令:
vuese preview path-to-your-component.vue
vuese 内部使用 puppeteer-core,当你预览的组件变更时,文档会实时更新。
一个例子:

使用配置文件
TIP
vuese 会在命令的运行目录搜索 vuese.config.js 或 .vueserc 或者是 package.json 文件的 vuese 属性,以下选项可以同时在命令行和配置文件中使用。
genType
- Type:
'docute'|'markdown' - Default:
'docute'
指定生成文档的类型,如果值为字符串 'docute',意味着你要生成的是 docute 文档,如果值为 'markdown',意味着仅生成 markdown 文件。
title
Only
--genType="docute"
- Type:
string - Default:
'Components'
指定生成 docute 文档侧边栏的标题。
include
- Type:
stringstring[] - Default:
["**/*.vue"]
指定哪些 .vue 文件需要被生成文档,默认情况下 vuese 会找到命令的运行目录以及所有子代目录下的所有 .vue 文件,并为他们生成文档。
exclude
- Type:
stringstring[] - Default:
[]
指定哪些 .vue 文件是不需要被生成文档的。
TIP
node_modules 目录下的所有 .vue 组件都不会被生成文档。
outDir
- Type:
string - Default:
website
docute 文档的输出目录。
markdownDir
- Type:
string| '*' - Default:
components
指定 markdown 文件的输出目录,需要注意的是,markdownDir 是基于 outDir 的,这意味着默认情况下 markdown 文件会被输出到 website/components 目录下。
有时,你希望组件的 markdown 文档生成在于组件相同的目录,你可以设置 markdownDir 的值为字符串 '*',假设你的目录结构如下:
root
├── src
├──├──  components
├──├──├──  Button.vue
├──├──├──  ButtonGroup.vue
文档生成之后,你将得到:
root
├── src
├──├──  components
├──├──├──  Button.vue
├──├──├──  Button.md
├──├──├──  ButtonGroup.vue
├──├──├──  ButtonGroup.md
markdownFile 2.3.0+
- Type:
string - Default:
''
TIP
仅当 genType: markdown 且 markdownDir: * 时有效。
用来指定生成的 markdown 文件的名字,当你希望为不同组件生成相同名字的文档时会很有用,例如你的目录结构如下:
root
├── src
├──├──  components
├──├──├──  Button
├──├──├──├──  index.vue
├──├──├──  ButtonGroup
├──├──├──├──  index.vue
如果不指定 markdownFile,则结果如下:
root
├── src
├──├──  components
├──├──├──  Button
├──├──├──├──  index.vue
├──├──├──├──  index.md
├──├──├──  ButtonGroup
├──├──├──├──  index.vue
├──├──├──├──  index.md
你可以通过配置文件或命令行指定 markdownFile: README,则结果如下:
root
├── src
├──├──  components
├──├──├──  Button
├──├──├──├──  index.vue
├──├──├──├──  README.md
├──├──├──  ButtonGroup
├──├──├──├──  index.vue
├──├──├──├──  README.md
babelParserPlugins
- Type:
object - Default:
{
  objectRestSpread: true,
  dynamicImport: true,
  'decorators-legacy': true,
  classProperties: true,
  typescript: true,
  jsx: true
}
vuese 使用 @babel/parser 解析 <script> 标签块,babelParserPlugins 选项接收所有 @babel/parser 的 plugsins 中的可选值,这给了你根据你的项目进行自定义解析行为的机制。例如:默认情况下 babelParserPlugins.jsx 和 babelParserPlugins.typescript 都为 true,这意味着在默认情况下 vuese 能够正确的处理 TS 和 TSX,但是却不能正确处理下面的类型断言写法:
(<any>this).$refs.navBar.offsetHeight
你应该使用 as 操作符替代:
(this as any).$refs.navBar.offsetHeight
这是因为 typescript 在 .tsx 文件里禁用了尖括号的类型断言,但你可能并没有使用 tsx,这时你可以在 .vueserc 配置文件中指定 jsx: false 来关闭对 jsx 的处理,这样就能够支持 <any>this 的类型断言了:
// .vueserc
{
  // ...
  babelParserPlugins: {
    jsx: false
  }
}
关于注释
到了这里,你应该理解了什么是:编写文档的过程就是为你的代码编写注释。实际上,在没有任何注释的情况下,vuese 已经拿到了它所能拿到的任何信息,注释只是一种提供更多信息的手段,vuese 尽量在减少注解(@xxx)的使用场景,目的是为了学习成本。换句话说你不需要花精力去记住大量的注解。
一切过程都应该顺气自然。
以 methods 为例:
methods: {
  clear (bol) {}
}
没有任何注释的情况下,vuese 只知道这个方法的名字叫 clear,它并不知道这个方法是否需要提供给组件的使用者,也不知道这个方法的作用,更不知道这个方法接收的参数代表什么。所以很自然的,使用 @vuese 注解来呼叫 vuese,告诉它这个方法是需要它为其生成文档的,为了让 vuese 知道该方法的用途,所以我们又添加了一行没有注解的注释,然后再添加一条注释用来告诉 vuese 该方法接收参数的作用,为了将参数的描述与函数的描述区分开,所以我们需要在参数的描述前添加 @arg 注解。还是那句话,一切都很自然。
另一个需要澄清的是,注释是无序的,如下两种注释意义相同:
methods: {
  // @vuese
  // Used to manually clear the form
  // @arg The argument is a boolean value representing xxx
  clear (bol) {
    // ...
  }
}
methods: {
  // Used to manually clear the form
  // @arg The argument is a boolean value representing xxx
  // @vuese
  clear (bol) {
    // ...
  }
}
另外,注释的种类不限,你可以使用单行注释,你也可以使用多行注释,甚至可以混用它们:
methods: {
  // @arg The argument is a boolean value representing xxx
  /**
   * @vuese
   * Used to manually clear the form
   */
  clear (bol) {
    // ...
  }
}
因为在 vuese 看来,这仅仅就是三行普通文本而已:
@arg The argument is a boolean value representing xxx
@vuese
Used to manually clear the form
如果你的描述比较冗长:
methods: {
  // @arg The first parameter represents xxx and the second parameter represents xxx
  // This function can be used for xxx and can also be used for xxx
  clear (bol) {
    // ...
  }
}
你还可以拆分他们:
methods: {
  // @arg The first parameter represents xxx
  // @arg and the second parameter represents xxx
  // This function can be used for xxx and
  // can also be used for xxx
  clear (bol) {
    // ...
  }
}
拆分前和拆分后的效果是一样的🙂。
增量更新
[TODO]
集成现有文档
[TODO]
